From Nitradopedia EN
Jump to: navigation, search
First, we need to gather the information about the Mod we intend to add using the Workshop on Steam. We will need to get the mod ID and the Workshop ID, every mod shows that information on its Workshop page description.
When it comes to Project Zomboid, the mods will require to be added directly into the configuration files, through the Web Interface.
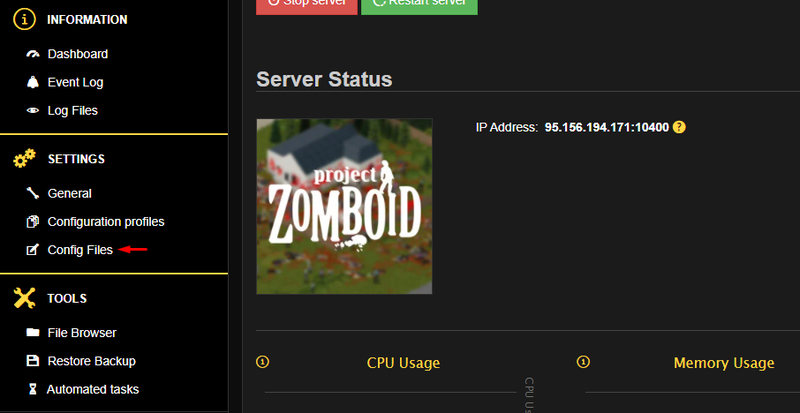
You should then be able to see the information stored in the servertest.ini file.
This is your Server’s most important configuration file, it contains most of the preferences for your Game-Server that will affect almost every aspect of the Game. Including the Mods you want to add.
The properties you need to locate on this file are Mods= and Workshopitems=.
You will need to enter the mod name on Mods=, and then the mod ID on Workshopitems=. The mod name need to be identical as how it shows on the Steam Workshop

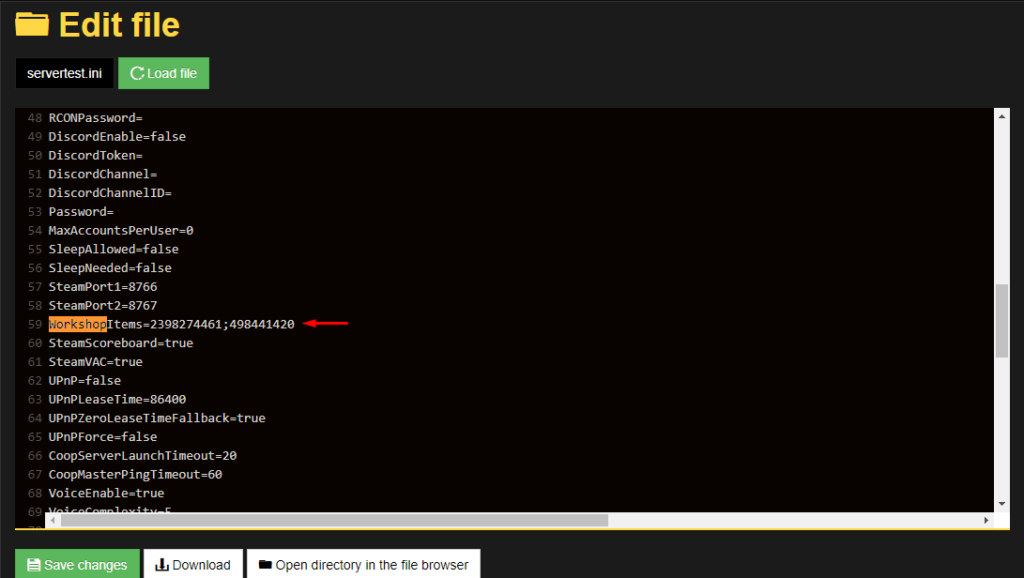
The following is an example of how the mods need to be entered properly:
WorkshopItems=2398274461;498441420
Mods=SaveOurStation_Core;Hydrocraft
(Each mod name and ID needs to be separated by a semicolon “;”)
Any other formatting will not work with the Server and the Mods will not be added.
Additionally,
It is important to have both the information of the Mods listed in order.

If you want a server setup using Project Zomboid with zero effort, get a server with BisectHosting and receive 25% off your first month as a new customer using the code kreezxil
Introduction
I have just spent the better part of a week looking for resources on how to host The Walking Dead Map and Hyrdocraft mod on my private server. I was struck at how spread out the information was and how it made assumptions that you knew the context for the instructions. Add on top of that old threads that no longer apply, and I was left with a nightmare.
I could see others shared my frustrations in forum posts. This is my contribution for anyone else wanting to set up a server. If you have more stuff to add/suggest, please comment and I will update this post.
Note: I am using Windows 10. My assumption is that this guide will give Mac and Linux users general context to understand other instructions or give them enough of a base to figure it out.
1: File Path ( a much needed primer)
Program Path:
It is important to understand file paths. When you install through Steam, Project Zomboid is installed at: C:\Program Files (x86)\Steam\SteamApps\common\ProjectZomboid, BUT if you install through SteamCMD, then the file path for the program is likely: C:\pzserver (at least it was for me).
This is where you will find the bat file that starts the server “StartSever64.bat.” One folder deeper, in the PZServerSettings folder, you can find the bat file to set all sorts of settings for your server, “PZServerSettings.bat.” Just double click the bat file to edit server settings.
Personal/Server Data Path
The first time you log into PZ and/or start a PZ server, it creates a personal folder for your local data/maps/characters and files for your server settings, local player, and basically everything unique to your Project Zomboid experience.
This folder is located at C:\Users\YOURUSERNAME\Zomboid .
Understanding those two locations is critical to understanding the instructions.
2: Getting Mods and Maps
There should be several folders created in your Personal/Server Data Path (C:\Users\YOURUSERNAME\Zomboid) when you first log on. However, not all folders are immediately created. A critical needed folder is mods.
What you want to do is start PZ and click on MODS in the lower left-hand corner, and then you click on the “get mods here!” button in the lower right corner. This will open up the community page for mods. I subscribed to both Hydrocraft and The Walking Dead Prison, so those will be my examples of installing mods and maps.
*A mod changes how the game plays, like by adding new recipes, elements, etc. A map just places a new map in the existing world but does not change the game in any other meaningful way. Both mods and maps are called mods in the community forum and placed in the same folder (we will get to that).
From the community page you can find a link to download the mod/map. It will download a zipped file. Once you download the mods you want unzip it into C:\Users\YOURUSERNAME\Zomboid\mods . The mod folder should now be there!
Once the unzipped mod/map folder is in the mods folder you can reopen PZ, click on MODS in the lower left hand corner, and then you will see your mods. You can then click to enable to them on that same PZ splash screen.
VERY IMPORTANT!!! Every person who logs onto your server needs the exact same mod/map unzipped into the mods folder.
3: Setting Up Server File
First you want to go to C:\Program Files (x86)\Steam\SteamApps\common\ProjectZomboid\PZServerSettings and double-click “PZServerSettings.bat.”
That will open a dialog box that lets you set stuff like max players, passwords, pvp options, starting loot, erosion speed, zombie distribution–a bunch of stuff.
What that actually does is edit some files in C:\Users\YOURUSERNAME\Zomboid\Server, notably servertest.ini and servertest_zombies.ini. The servertest.ini file is the most important file you will edit at this point!
3a: Mods
Mods are easy. In the servertest.ini file there is a line called “Mods=” All you have to do is first navigate to your recently downloaded mod and look for a file which gives you its’ Mod name. Hydrocraft has a file called “mod.info,” and opening it in notepad reveals the name as Hydrocraft.
So in the Mods= line I would put in Hydrocraft. It would look like this: Mods=Hydrocraft. If you have multiple mods, then you separate their names with a semicolon but no spaces. So it would look like Mods=mod1;mod2 .
That’s it! if everyone has the same mods in C:\Users\YOURUSERNAME\Zomboid\mods, then the mod should work!
3b:Maps
Maps work very similar to mods. You unzip it in the same mods folder and look for the name. For the Walking Dead Prison mod, I found a file called “workshop.txt” that acted like the “mod.info” file in that is had the information I needed to get it working.
The title, another name for name, is: The Walking Dead Prison v1.3 So, like I did with Hydrocraft, I needed to add the mod name to the Mods= line. I ended up with Mods=Hydrocraft;The Walking Dead V1.3 .
With maps you also need to modify the WorkshopItems= line and the Maps= line.
The WorkshopItems line was easy. The workshop.txt file in the Walking Dead Prison Mod folder said: id=524066677. The map name baffled me. I knew I needed it, but I didn’t know what it was. Looking through the comments on the mod page, I saw iGitzBumpKinz post: @GN88 id=524066677
Map=TheWalkingDeadPrison
EDIT: EnigmaGrey (developer?) in another post said “Now, go to the media/maps directory of each of the map mod. See the folder name for the map name? That’s the actual name of the map — e.g. Muldraugh KY” That is how to get the map name!
So I added the id and the map to their respective lines in the servertest.ini file and ended up with Map=TheWalkingDeadPrison;Muldraugh, KY and WorkshopItems=524066677 .
Note: Muldraugh, KY always needs to be at the end of the list of maps!
Conclusion:
So there you have it…
1: You download your mods and maps and unzip them in the mods folder in the Zomboid folder under your username on your computer
2: You set up your server settings with the PZServerSettings.bat file found in the PZServerSettings folder in your program file path.
3: Mods only need the servertest.ini Mods= to have the correct mod name.
4: Maps need the servertest.ini file to reflect the Mods= , Map= and WorkshopItem= correct information. If there are more then one item/mod/map in a line, then it gets divided by a semicolon with no spaces.
If everyone has the same mods in the same folders, then it should work!
Misc
If you want to learn how to port forward, this is a good YouTube video. Understand all routers look different, so you have to poke around a bit to find where to port forward.
If you want to set up a server using SteamCMD then this is a good guide[https//whttps].
If you want to make custom Spawn points, which I HIGHLY recommend, then read this post carefully[https//whttp].
If you need the coordinates for your custom spawn points, then you probably know of the Project Zomboid Map project[pzmap.crash-override.net]. Did you know on the overlay you can toggle on different community made maps and see where they are on the world map and get coordinates that way?! It is awesome.
***** Please let me know if I was wrong in something or if anything should be added. Sorry it is wordy, but this guide is for the noob who is frustrated and wants some context.
Thank you!
Personal Questions I hope a Developer or Commentor can clarify
1: What is the purpose of subscribing to the mod? It seems you have to manually download the mod anyway. Does subscribing keep it up to date, let you know what you are interested in like a bookmark, or will it automatically download mod in correct folder? Do we re-download it after each update?
2: Exactly what is the purpose of the “WorkshopItems= “line in the servertest.ini file? It seems I only need it for maps. If I put in a regular mod item# in there, will it break it or keep it updated or is that not necessary?
3: A lot of older guides, even as of three months ago, have us going into “/Steam/steamapps/workshop/” folder, but I don’t think that is necessary anymore. Is it true as of build 33.20 that with mods and maps we just drop them in the Zomboid\mods folder and edit the servertest.ini? Or am I just lucky with the mod and map I tested?
4: Since I make custom spawn points so users can spawn in the same location, I am not familiar with how adding a generic spawn point is handled if you add a map to your server. Is there any editing on the lua files that needs to be edited so that users can choose the new map as a potential spawn location?
Personally I just make a couple specific spawn locations with set coordinates so a group of players don’t need to find each other after logging in for the first time.
Response to t0tal because comments are limited in space…
Are you saying I can open the regular servertest_spawnregions.lua file , which looks like this:
-- This file was automatically generated when the server was first started.
-- Clients connecting to the server can choose to spawn in one of the following spawn regions.
-- The administrator can add as many different spawn regions as he/she wants.
function SpawnRegions()
    return {
      { name = "Muldraugh, KY", file = "media/maps/Muldraugh, KY/spawnpoints.lua" },
      { name = "West Point, KY", file = "media/maps/West Point, KY/spawnpoints.lua" },
-- Uncomment the line below to add a custom spawnpoint for this server.
   -- { name = "Twiggy's Bar", serverfile = "servertest_spawnpoints.lua" },
   }
end
And add in
-- This file was automatically generated when the server was first started.
-- Clients connecting to the server can choose to spawn in one of the following spawn regions.
-- The administrator can add as many different spawn regions as he/she wants.
function SpawnRegions()
    return {
       { name = "Muldraugh, KY", file = "media/maps/Muldraugh, KY/spawnpoints.lua" },
       { name = "West Point, KY", file = "media/maps/West Point, KY/spawnpoints.lua" },
       { name = "The Walking Dead Prison v1.3", file = "media/maps/TheWalkingDeadPrison/spawnpoints.lua" },
-- Uncomment the line below to add a custom spawnpoint for this server.
    -- { name = "Twiggy's Bar", serverfile = "servertest_spawnpoints.lua" },
   }
end
and it will add a Prison option as a spawn point, like in a regular game when you can choose between Muldraugh or West Point? Would it be random?
and then if you want to add specific coordinates you uncomment the line and add custom spawnpoints?
***
How I have it is I have the servertest_spawnregions.lua have 4 entries like the one listed below
function to SpawnRegions()
    return {
       { name = "Prison : The Walking Dead Prison V1.3", server file = "servertest_prison.lua },
    }
end
and then I create a file for each spawn point like servertest_prison.lua and add in the coordinates exactly where I want them to spawn like:
function SpawnPoints()
   return {
      unemployed = {
        { worldX = 32, worldY = 31, posX = 297, posY = 223 }
      }
   }
end
Sources: wiki.nitrado.net/en/How_to_add_mods_to_a_Project_Zomboid_server, steamcommunity.com/sharedfiles/filedetails/?id=630799067


From Nitradopedia EN
Jump to: navigation, search
First, we need to gather the information about the Mod we intend to add using the Workshop on Steam. We will need to get the mod ID and the Workshop ID, every mod shows that information on its Workshop page description.
When it comes to Project Zomboid, the mods will require to be added directly into the configuration files, through the Web Interface.
You should then be able to see the information stored in the servertest.ini file.
This is your Server’s most important configuration file, it contains most of the preferences for your Game-Server that will affect almost every aspect of the Game. Including the Mods you want to add.
The properties you need to locate on this file are Mods= and Workshopitems=.
You will need to enter the mod name on Mods=, and then the mod ID on Workshopitems=. The mod name need to be identical as how it shows on the Steam Workshop
The following is an example of how the mods need to be entered properly:
WorkshopItems=2398274461;498441420
Mods=SaveOurStation_Core;Hydrocraft
(Each mod name and ID needs to be separated by a semicolon “;”)
Any other formatting will not work with the Server and the Mods will not be added.
Additionally,
It is important to have both the information of the Mods listed in order.
If you want a server setup using Project Zomboid with zero effort, get a server with BisectHosting and receive 25% off your first month as a new customer using the code kreezxil
Introduction
I have just spent the better part of a week looking for resources on how to host The Walking Dead Map and Hyrdocraft mod on my private server. I was struck at how spread out the information was and how it made assumptions that you knew the context for the instructions. Add on top of that old threads that no longer apply, and I was left with a nightmare.
I could see others shared my frustrations in forum posts. This is my contribution for anyone else wanting to set up a server. If you have more stuff to add/suggest, please comment and I will update this post.
Note: I am using Windows 10. My assumption is that this guide will give Mac and Linux users general context to understand other instructions or give them enough of a base to figure it out.
1: File Path ( a much needed primer)
Program Path:
It is important to understand file paths. When you install through Steam, Project Zomboid is installed at: C:\Program Files (x86)\Steam\SteamApps\common\ProjectZomboid, BUT if you install through SteamCMD, then the file path for the program is likely: C:\pzserver (at least it was for me).
This is where you will find the bat file that starts the server “StartSever64.bat.” One folder deeper, in the PZServerSettings folder, you can find the bat file to set all sorts of settings for your server, “PZServerSettings.bat.” Just double click the bat file to edit server settings.
Personal/Server Data Path
The first time you log into PZ and/or start a PZ server, it creates a personal folder for your local data/maps/characters and files for your server settings, local player, and basically everything unique to your Project Zomboid experience.
This folder is located at C:\Users\YOURUSERNAME\Zomboid .
Understanding those two locations is critical to understanding the instructions.
2: Getting Mods and Maps
There should be several folders created in your Personal/Server Data Path (C:\Users\YOURUSERNAME\Zomboid) when you first log on. However, not all folders are immediately created. A critical needed folder is mods.
What you want to do is start PZ and click on MODS in the lower left-hand corner, and then you click on the “get mods here!” button in the lower right corner. This will open up the community page for mods. I subscribed to both Hydrocraft and The Walking Dead Prison, so those will be my examples of installing mods and maps.
*A mod changes how the game plays, like by adding new recipes, elements, etc. A map just places a new map in the existing world but does not change the game in any other meaningful way. Both mods and maps are called mods in the community forum and placed in the same folder (we will get to that).
From the community page you can find a link to download the mod/map. It will download a zipped file. Once you download the mods you want unzip it into C:\Users\YOURUSERNAME\Zomboid\mods . The mod folder should now be there!
Once the unzipped mod/map folder is in the mods folder you can reopen PZ, click on MODS in the lower left hand corner, and then you will see your mods. You can then click to enable to them on that same PZ splash screen.
VERY IMPORTANT!!! Every person who logs onto your server needs the exact same mod/map unzipped into the mods folder.
3: Setting Up Server File
First you want to go to C:\Program Files (x86)\Steam\SteamApps\common\ProjectZomboid\PZServerSettings and double-click “PZServerSettings.bat.”
That will open a dialog box that lets you set stuff like max players, passwords, pvp options, starting loot, erosion speed, zombie distribution–a bunch of stuff.
What that actually does is edit some files in C:\Users\YOURUSERNAME\Zomboid\Server, notably servertest.ini and servertest_zombies.ini. The servertest.ini file is the most important file you will edit at this point!
3a: Mods
Mods are easy. In the servertest.ini file there is a line called “Mods=” All you have to do is first navigate to your recently downloaded mod and look for a file which gives you its’ Mod name. Hydrocraft has a file called “mod.info,” and opening it in notepad reveals the name as Hydrocraft.
So in the Mods= line I would put in Hydrocraft. It would look like this: Mods=Hydrocraft. If you have multiple mods, then you separate their names with a semicolon but no spaces. So it would look like Mods=mod1;mod2 .
That’s it! if everyone has the same mods in C:\Users\YOURUSERNAME\Zomboid\mods, then the mod should work!
3b:Maps
Maps work very similar to mods. You unzip it in the same mods folder and look for the name. For the Walking Dead Prison mod, I found a file called “workshop.txt” that acted like the “mod.info” file in that is had the information I needed to get it working.
The title, another name for name, is: The Walking Dead Prison v1.3 So, like I did with Hydrocraft, I needed to add the mod name to the Mods= line. I ended up with Mods=Hydrocraft;The Walking Dead V1.3 .
With maps you also need to modify the WorkshopItems= line and the Maps= line.
The WorkshopItems line was easy. The workshop.txt file in the Walking Dead Prison Mod folder said: id=524066677. The map name baffled me. I knew I needed it, but I didn’t know what it was. Looking through the comments on the mod page, I saw iGitzBumpKinz post: @GN88 id=524066677
Map=TheWalkingDeadPrison
EDIT: EnigmaGrey (developer?) in another post said “Now, go to the media/maps directory of each of the map mod. See the folder name for the map name? That’s the actual name of the map — e.g. Muldraugh KY” That is how to get the map name!
So I added the id and the map to their respective lines in the servertest.ini file and ended up with Map=TheWalkingDeadPrison;Muldraugh, KY and WorkshopItems=524066677 .
Note: Muldraugh, KY always needs to be at the end of the list of maps!
Conclusion:
So there you have it…
1: You download your mods and maps and unzip them in the mods folder in the Zomboid folder under your username on your computer
2: You set up your server settings with the PZServerSettings.bat file found in the PZServerSettings folder in your program file path.
3: Mods only need the servertest.ini Mods= to have the correct mod name.
4: Maps need the servertest.ini file to reflect the Mods= , Map= and WorkshopItem= correct information. If there are more then one item/mod/map in a line, then it gets divided by a semicolon with no spaces.
If everyone has the same mods in the same folders, then it should work!
Misc
If you want to learn how to port forward, this is a good YouTube video. Understand all routers look different, so you have to poke around a bit to find where to port forward.
If you want to set up a server using SteamCMD then this is a good guide[https//whttps].
If you want to make custom Spawn points, which I HIGHLY recommend, then read this post carefully[https//whttp].
If you need the coordinates for your custom spawn points, then you probably know of the Project Zomboid Map project[pzmap.crash-override.net]. Did you know on the overlay you can toggle on different community made maps and see where they are on the world map and get coordinates that way?! It is awesome.
***** Please let me know if I was wrong in something or if anything should be added. Sorry it is wordy, but this guide is for the noob who is frustrated and wants some context.
Thank you!
Personal Questions I hope a Developer or Commentor can clarify
1: What is the purpose of subscribing to the mod? It seems you have to manually download the mod anyway. Does subscribing keep it up to date, let you know what you are interested in like a bookmark, or will it automatically download mod in correct folder? Do we re-download it after each update?
2: Exactly what is the purpose of the “WorkshopItems= “line in the servertest.ini file? It seems I only need it for maps. If I put in a regular mod item# in there, will it break it or keep it updated or is that not necessary?
3: A lot of older guides, even as of three months ago, have us going into “/Steam/steamapps/workshop/” folder, but I don’t think that is necessary anymore. Is it true as of build 33.20 that with mods and maps we just drop them in the Zomboid\mods folder and edit the servertest.ini? Or am I just lucky with the mod and map I tested?
4: Since I make custom spawn points so users can spawn in the same location, I am not familiar with how adding a generic spawn point is handled if you add a map to your server. Is there any editing on the lua files that needs to be edited so that users can choose the new map as a potential spawn location?
Personally I just make a couple specific spawn locations with set coordinates so a group of players don’t need to find each other after logging in for the first time.
Response to t0tal because comments are limited in space…
Are you saying I can open the regular servertest_spawnregions.lua file , which looks like this:
-- This file was automatically generated when the server was first started.
-- Clients connecting to the server can choose to spawn in one of the following spawn regions.
-- The administrator can add as many different spawn regions as he/she wants.
function SpawnRegions()
    return {
      { name = "Muldraugh, KY", file = "media/maps/Muldraugh, KY/spawnpoints.lua" },
      { name = "West Point, KY", file = "media/maps/West Point, KY/spawnpoints.lua" },
-- Uncomment the line below to add a custom spawnpoint for this server.
   -- { name = "Twiggy's Bar", serverfile = "servertest_spawnpoints.lua" },
   }
end
And add in
-- This file was automatically generated when the server was first started.
-- Clients connecting to the server can choose to spawn in one of the following spawn regions.
-- The administrator can add as many different spawn regions as he/she wants.
function SpawnRegions()
    return {
       { name = "Muldraugh, KY", file = "media/maps/Muldraugh, KY/spawnpoints.lua" },
       { name = "West Point, KY", file = "media/maps/West Point, KY/spawnpoints.lua" },
       { name = "The Walking Dead Prison v1.3", file = "media/maps/TheWalkingDeadPrison/spawnpoints.lua" },
-- Uncomment the line below to add a custom spawnpoint for this server.
    -- { name = "Twiggy's Bar", serverfile = "servertest_spawnpoints.lua" },
   }
end
and it will add a Prison option as a spawn point, like in a regular game when you can choose between Muldraugh or West Point? Would it be random?
and then if you want to add specific coordinates you uncomment the line and add custom spawnpoints?
***
How I have it is I have the servertest_spawnregions.lua have 4 entries like the one listed below
function to SpawnRegions()
    return {
       { name = "Prison : The Walking Dead Prison V1.3", server file = "servertest_prison.lua },
    }
end
and then I create a file for each spawn point like servertest_prison.lua and add in the coordinates exactly where I want them to spawn like:
function SpawnPoints()
   return {
      unemployed = {
        { worldX = 32, worldY = 31, posX = 297, posY = 223 }
      }
   }
end
Sources: wiki.nitrado.net/en/How_to_add_mods_to_a_Project_Zomboid_server, steamcommunity.com/sharedfiles/filedetails/?id=630799067